# Python 和 Civil 3D

虽然 Dynamo 是一款功能非常强大的[可视化编程](/zh-cn/a_appendix/a-1_visual-programming-and-dynamo.md)工具，但也可以越过节点和导线，以文本形式编写代码。有两种方法可以执行此操作：

1. 使用代码块编写 **DesignScript**
2. 使用 Python 节点编写 **Python**

本部分将重点介绍如何在 Civil 3D 环境中利用 Python，来利用 AutoCAD 和 Civil 3D .NET API。

{% hint style="info" %}
有关如何在 Dynamo 中使用 Python 的更多常规信息，请参见 [Python](/zh-cn/8_coding_in_dynamo/8-3_python.md) 部分。
{% endhint %}

## API 文档

AutoCAD 和 Civil 3D 都提供了多个 API，使像您这样的开发人员能够使用自定义功能扩展核心产品。在 Dynamo 的上下文中，相关的**托管 .NET API** 可用。以下链接对于了解 API 的结构及其工作方式至关重要。

[AutoCAD .NET API 开发人员手册](https://help.autodesk.com/view/OARX/2024/CHS/?guid=GUID-C3F3C736-40CF-44A0-9210-55F6A939B6F2)

[AutoCAD .NET API 参考手册](https://help.autodesk.com/view/OARX/2024/CHS/?guid=OARX-ManagedRefGuide-What_s_New)

[Civil 3D .NET API 开发人员手册](https://help.autodesk.com/view/CIV3D/2024/CHS/?guid=GUID-DA303320-B66D-4F4F-A4F4-9FBBEC0754E0)

[Civil 3D .NET API 参考手册](https://help.autodesk.com/view/CIV3D/2024/CHS/?guid=73fd1950-ee31-00b8-4872-c3f328ea1331)

{% hint style="info" %}
在您浏览此部分时，可能会有一些您不熟悉的概念（如数据库、事务、方法、特性等）。其中许多概念是使用 .NET API 的核心，并不是 Dynamo 或 Python 特有的。本 Primer 的此部分不会详细讨论这些项目，因此建议您经常参见上述链接以了解详细信息。
{% endhint %}

## 代码模板

当第一次编辑一个新的 Python 节点时，该节点会预填充模板代码以便于您快速开始。以下是模板的详细介绍，其中包含有关每个块的说明。

<figure><img src="/files/gES4KKp89Ro9pajPXHKu" alt=""><figcaption><p>Civil 3D 中的默认 Python 模板</p></figcaption></figure>

> 1. 输入 `sys` 和 `clr` 模块，这两个模块都是 Python 解释器能够正常运行所必需的。特别是，`clr` 模块使 .NET 名称空间能够基本上被视为 Python 软件包。
> 2. 加载标准程序集（即 DLL），以使托管 .NET API 能够用于 AutoCAD 和 Civil 3D。
> 3. 添加对标准 AutoCAD 和 Civil 3D 名称空间的引用。这些引用分别相当于 C# 或 VB.NET 中的 `using` 或 `Imports` 指令。
> 4. 可使用名为 `IN` 的预定义列表来访问节点的输入端口。可以使用特定端口的索引号来访问该端口中的数据（例如，`dataInFirstPort = IN[0]`）。
> 5. 获取活动文档和编辑器。
> 6. 锁定文档并启动数据库事务。
> 7. 在此应放置脚本的大部分逻辑。
> 8. 在主要工作完成后，取消注释此行以提交事务。
> 9. 如果要输出节点中的任何数据，请在脚本末尾将该节点指定给 `OUT` 变量。

{% hint style="info" %}
**要自定义？**\
可以通过编辑位于 `C:\ProgramData\Autodesk\C3D <version>\Dynamo` 中的 `PythonTemplate.py` 文件，来修改默认 Python 模板。
{% endhint %}

## 示例

让我们通过一个示例来演示在 Dynamo for Civil 3D 中编写 Python 脚本的一些基本概念。

### 目标

> :dart: 获取图形中所有汇流的边界几何图形。

### 数据集

以下是可以在本次练习中参照的示例文件。

{% file src="/files/MV54dJyMabK2kuo4BsA6" %}

{% file src="/files/cOcHvnOeYr809pjRqkjr" %}

### 解决方案概述

下面概述了此图形中的逻辑。

> 1. 查看 Civil 3D API 文档
> 2. 按图层名称选择文档中的所有汇流
> 3. “展开”Dynamo 对象以访问 Civil 3D API 内部成员
> 4. 从 AutoCAD 点创建 Dynamo 点
> 5. 从点创建 PolyCurve

开始吧！

### 查看 API 文档

在我们开始构建图形和编写代码之前，最好先查看 Civil 3D API 文档，了解 API 的可用内容。在这种情况下，[Catchment 类中有一个特性](https://help.autodesk.com/view/CIV3D/2024/CHS/?guid=d3140831-672f-d9bb-3be7-9886a0e19f5c)，该特性会返回汇流的边界点。请注意，此特性会返回一个 `Point3dCollection` 对象，而 Dynamo 并不会知道该如何处理该对象。换句话说，我们将无法从 `Point3dCollection` 创建 PolyCurve，因此最终需要将所有内容都转换为 Dynamo 点。稍后会对此进行详细介绍。

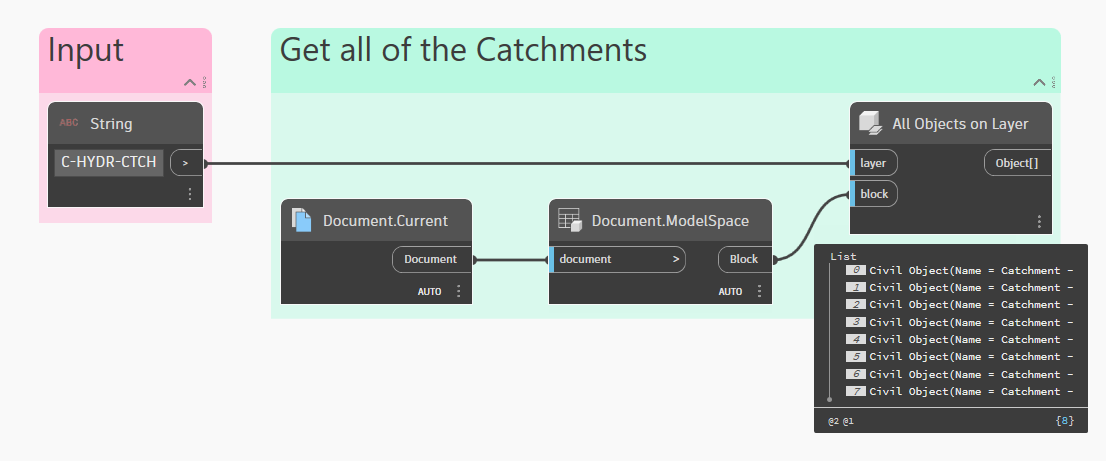
### 获取所有汇流

现在，我们可以开始构建图形逻辑。首先，获取文档中所有汇流的列表。有节点可用于此操作，因此我们不需要将其包含在 Python 脚本中。使用节点可以为可能读取图形的其他人提供更好的可见性（而不是在 Python 脚本中隐藏大量代码），它还使 Python 脚本能够专注于一件事：返回汇流的边界点。

<figure><img src="/files/2DEDEIpsgC2XE7qc4dIu" alt=""><figcaption><p>按图层获取文档中的所有汇流</p></figcaption></figure>

请注意，**All Objects on Layer** 节点的输出内容是 CivilObject 的列表。这是因为 Dynamo for Civil 3D 当前没有任何用于处理汇流的节点，这正是我们需要通过 Python 访问 API 的原因。

### 展开对象

在进一步介绍之前，我们需要简要介绍一个重要概念。在[节点库](/zh-cn/dynamo-for-civil-3d/node-library.md)部分中，我们讨论了 Objects 和 CivilObject 之间的关系。对此详加说明，**Dynamo Object** 是 **AutoCAD Entity** 的包裹器。同样，**Dynamo CivilObject** 是 **Civil 3D Entity** 的包裹器。可以通过访问对象的 `InternalDBObject` 或 `InternalObjectId` 特性来“展开”该对象。

<table data-full-width="false"><thead><tr><th width="377.3333333333333">Dynamo 类型</th><th width="373">包裹</th></tr></thead><tbody><tr><td><strong>Object</strong><br>Autodesk.AutoCAD.DynamoNodes.Object</td><td><strong>Entity</strong><br>Autodesk.AutoCAD.DatabaseServices.Entity</td></tr><tr><td><strong>CivilObject</strong><br>Autodesk.Civil.DynamoNodes.CivilObject</td><td><strong>Entity</strong><br>Autodesk.Civil.DatabaseServices.Entity</td></tr></tbody></table>

{% hint style="warning" %}
根据经验，通常使用 `InternalObjectId` 特性获取对象 ID，然后在事务中访问包裹对象更安全。这是因为 `InternalDBObject` 特性会返回一个不处于可写状态的 AutoCAD DBObject。
{% endhint %}

### Python 脚本

以下是一个完整的 Python 脚本，用于访问内部汇流对象以获取其边界点。亮显行表示基于默认模板代码修改/添加的行。

{% hint style="info" %}
单击脚本中带下划线的文字，可了解每行的说明。
{% endhint %}

<pre class="language-python" data-line-numbers><code class="lang-python"># 加载 Python 标准库和 DesignScript 库
import sys
import clr

# 添加 AutoCAD 和 Civil 3D 的程序集
clr.AddReference('AcMgd')
clr.AddReference('AcCoreMgd')
clr.AddReference('AcDbMgd')
clr.AddReference('AecBaseMgd')
clr.AddReference('AecPropDataMgd')
clr.AddReference('AeccDbMgd')

<a data-footnote-ref href="#user-content-fn-1">clr.AddReference('ProtoGeometry')</a>

# 从 AutoCAD 输入参照
from Autodesk.AutoCAD.Runtime import *
from Autodesk.AutoCAD.ApplicationServices import *
from Autodesk.AutoCAD.EditorInput import *
from Autodesk.AutoCAD.DatabaseServices import *
from Autodesk.AutoCAD.Geometry import *

# 从 Civil3D 输入参照
from Autodesk.Civil.ApplicationServices import *
from Autodesk.Civil.DatabaseServices import *

<a data-footnote-ref href="#user-content-fn-2">from Autodesk.DesignScript.Geometry import Point as DynPoint</a>

# 此节点的输入内容将以列表形式存储在 IN 变量中。
<strong><a data-footnote-ref href="#user-content-fn-3">objs</a> = <a data-footnote-ref href="#user-content-fn-4">IN[0]</a>
</strong>
<a data-footnote-ref href="#user-content-fn-5">output = []</a>

<a data-footnote-ref href="#user-content-fn-6">if objs is None:</a>
<strong>    <a data-footnote-ref href="#user-content-fn-7">sys.exit("The input is null or empty.")</a>
</strong>
<a data-footnote-ref href="#user-content-fn-8">if not isinstance(objs, list):</a>
<strong>    <a data-footnote-ref href="#user-content-fn-9">objs = [objs]</a>
</strong>   
adoc = Application.DocumentManager.MdiActiveDocument
editor = adoc.Editor

with adoc.LockDocument():
    with adoc.Database as db:
        
        with db.TransactionManager.StartTransaction() as t:
<strong>            <a data-footnote-ref href="#user-content-fn-10">for obj in objs:</a>             
</strong><strong>                <a data-footnote-ref href="#user-content-fn-11">id = obj.InternalObjectId</a>
</strong><strong>                <a data-footnote-ref href="#user-content-fn-12">aeccObj = t.GetObject(id, OpenMode.ForRead)</a>               
</strong><strong>                <a data-footnote-ref href="#user-content-fn-13">if isinstance(aeccObj, Catchment):</a>
</strong><strong>                    <a data-footnote-ref href="#user-content-fn-14">catchment = aeccObj</a>
</strong><strong>                    <a data-footnote-ref href="#user-content-fn-15">acPnts = catchment.BoundaryPolyline3d</a>                   
</strong><strong>                    <a data-footnote-ref href="#user-content-fn-16">dynPnts = []</a>
</strong><strong>                    <a data-footnote-ref href="#user-content-fn-17">for acPnt in acPnts:</a>
</strong><strong>                        <a data-footnote-ref href="#user-content-fn-18">pnt = DynPoint.ByCoordinates(acPnt.X, acPnt.Y, acPnt.Z)</a>
</strong><strong>                        <a data-footnote-ref href="#user-content-fn-19">dynPnts.append(pnt)</a>
</strong><strong>                    <a data-footnote-ref href="#user-content-fn-20">output.append(dynPnts)</a>
</strong>           
            # 在结束事务前提交
<strong>            <a data-footnote-ref href="#user-content-fn-21">t.Commit()</a>
</strong>            pass
            
# 将输出内容指定给 OUT 变量。
<a data-footnote-ref href="#user-content-fn-22">OUT = output</a>
</code></pre>

{% hint style="warning" %}
根据经验，最好将大部分脚本逻辑包含在事务中。这可确保安全访问脚本正在读/写的对象。在许多情况下，忽略事务可能会导致出现致命错误。
{% endhint %}

### 创建 PolyCurve

在此阶段，Python 脚本应该会输出可在后台预览中看到的 Dynamo 点列表。最后一步是从这些点创建 PolyCurve。请注意，这也可以直接在 Python 脚本中完成，但我们有意将其放置在脚本之外的节点中，以便它更明显。最终图形如下所示。

<figure><img src="/files/UMEjd4uOrehlW9mgSmDz" alt=""><figcaption><p>最终图形</p></figcaption></figure>

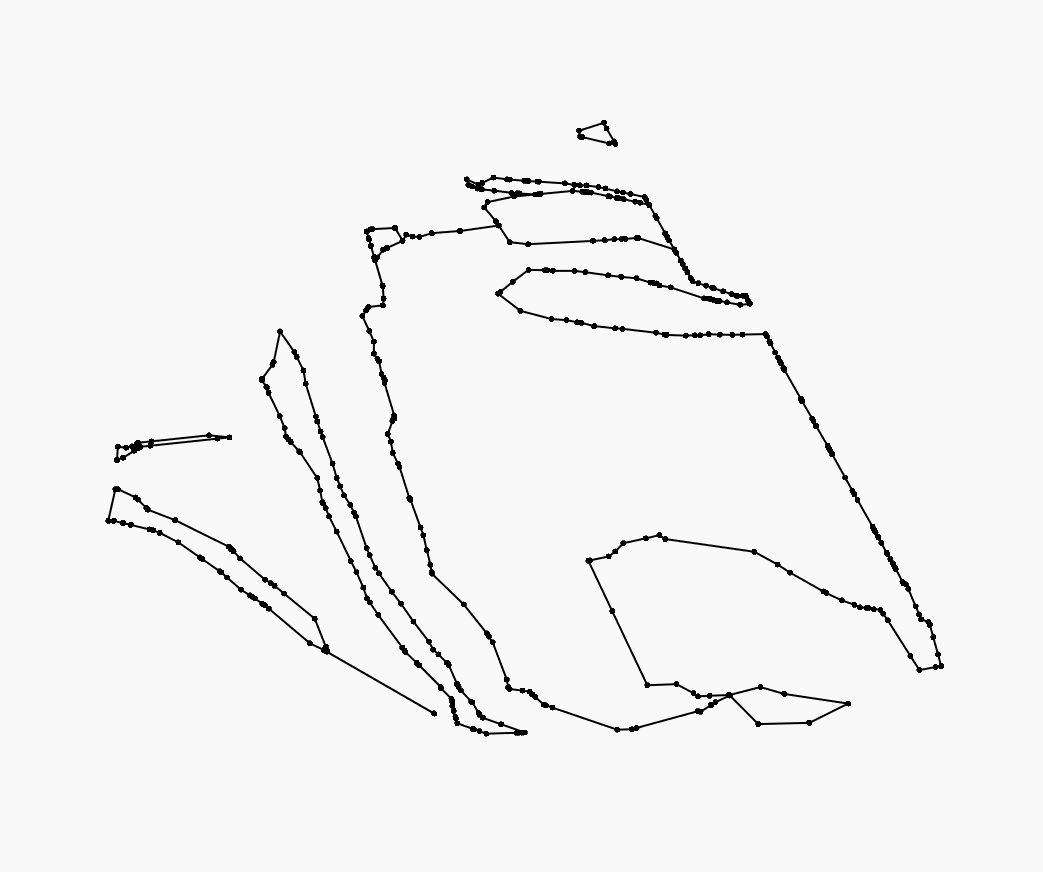
### 结果

以下最终的 Dynamo 几何图形。

<figure><img src="/files/oyO1twSDIS7Vgcih0tyR" alt=""><figcaption><p>生成的汇流边界的 Dynamo PolyCurve</p></figcaption></figure>

> :tada: 任务完成！

## IronPython 与 CPython

在我们结束之前，作一个简短说明。根据您正在使用的 Civil 3D 版本，Python 节点的配置可能会有所不同。在 **Civil 3D 2020 和 2021** 中，Dynamo 使用名为 **IronPython** 的工具在 .NET 对象和 Python 脚本之间移动数据。但在 **Civil 3D 2022** 中，Dynamo 转变为使用标准的本地 Python 解释器（也称为 **CPython**），而不是使用 Python 3。此转变的好处包括能够访问常用现代库和新平台功能、基本维护和安全修补程序。

{% hint style="info" %}
可以在 [Dynamo 博客](https://dynamobim.org/why-has-dynamo-switched-to-python-3-should-i-update-too/) 上，详细了解此转变以及如何升级旧脚本。如果要继续使用 IronPython，只需使用 Dynamo Package Manager 安装 **DynamoIronPython2.7** 软件包。
{% endhint %}

[^1]: 默认情况下，Dynamo 几何图形库不会添加到 Python 环境中。我们使用此脚本的目标是输出汇流边界的 Dynamo 点列表，因此我们需要添加此行以便稍后创建点。

[^2]: 此行从 Dynamo 几何图形库中获取我们需要的特定类。请注意，我们在此处指定 `import Point as DynPoint` 而不是 `import *`，因为后者会引发命名冲突。

[^3]: 此处，我们将默认变量 `dataEnteringNode` 重命名为 `objs`，以便该名称更具描述性。

[^4]: 在此处，我们准确指定哪个输入端口包含我们需要的数据，而不是使用默认的 `IN`，后者指的是所有输入的整个列表。

[^5]: 这将创建一个空列表，我们稍后会将输出数据添加到该列表中。

[^6]: 这是为了防止我们的脚本中可能出现空值或 null 输入。

[^7]: 我们将输出一条有用消息来说明脚本无法继续运行的原因，而不是中断运行脚本。

[^8]: 脚本的其余部分假定我们有一个要处理的对象列表（而不是单个对象）。但是，如果只有一个对象（即，具有单个汇流的图形），我们仍希望脚本能够运行。

[^9]: 如果输入不是一个列表（即，单个对象），我们只需创建一个新列表（其中该对象作为唯一项）。

[^10]: 为列表中的每个对象启动一个循环。

[^11]: 通过获取 Dynamo 对象的对象 ID，“展开”该对象。

[^12]: 从 AutoCAD 数据库中检索“包裹”对象。请注意，由于我们不打算对对象进行任何编辑，因此 OpenMode 在此处设置为 `ForRead`。我们只是在简单地“查询”数据。

[^13]: 输入的对象列表可能同时包含汇流和其他非汇流项目。我们需要检查是否存在此情况，并进行相应处理（即，仅当项目确实是汇流时，才继续循环的此迭代）。

[^14]: 如果脚本已运行到此处，那么我们就知道该对象确实是汇流。我们将在此处添加一个新变量，仅为了使命名保持清晰易懂。

[^15]: 此处是我们使用先前在 API 文档中查找的相应特性来检索汇流边界点的位置。如前所述，这将为我们提供一个 `Point3dCollection` 对象，它本质上是一个 AutoCAD 点列表。我们需要将这些点“转换”为 Dynamo 点，这样一来它们才可用。

[^16]: 创建一个空列表以存储此汇流的边界点。

[^17]: 为 `Point3dCollection` 中的每个 `Point3d` 对象启动循环。

[^18]: 使用 AutoCAD 点的坐标创建 Dynamo 点。

[^19]: 将点添加到列表中。

[^20]: 完成所有 AutoCAD 点到 Dynamo 点的“转换”后，我们将生成的列表添加到输出中。之后，外部循环将移动到输入列表中的下一个对象。

[^21]: 取消注释此行以提交事务。

[^22]: 最后但同样重要的是，我们输出 Dynamo 点列表。


---

# Agent Instructions: Querying This Documentation

If you need additional information that is not directly available in this page, you can query the documentation dynamically by asking a question.

Perform an HTTP GET request on the current page URL with the `ask` query parameter:

```
GET https://primer2.dynamobim.org/zh-cn/dynamo-for-civil-3d/advanced-topics/python-and-civil-3d.md?ask=<question>
```

The question should be specific, self-contained, and written in natural language.
The response will contain a direct answer to the question and relevant excerpts and sources from the documentation.

Use this mechanism when the answer is not explicitly present in the current page, you need clarification or additional context, or you want to retrieve related documentation sections.